In any kitchen, the chef's knife is the most important tool. However, it's also the most neglected as are other Japanese knives in the block. Why? It's intimidating to sharpen your knife, especially if you've never done so.
Maybe, you believed the honing steel could sharpen the knives for you. However, you learn later that honing just straightens the edge of your knives and doesn't offer sharpening abilities.
Therefore, you need to learn how to sharpen a knife. Whetstone sharpening is an excellent skill to focus on because sharp knives require less force and pressure to cut, making them more predictable.
You've probably had that scary moment where the Japanese knife slipped on what you were cutting, almost injuring yourself. Using a dull knife is highly dangerous. A sharp knife works better, so you can cut the herbs instead of damaging them and prepare ingredients faster.
Sharp knives don't give you the cutting skills of a Japanese master chef, but it makes life easier when the blade is sharp, and you can sharpen them with a whetstone.
What You Need to Start with
- Dull knife blade
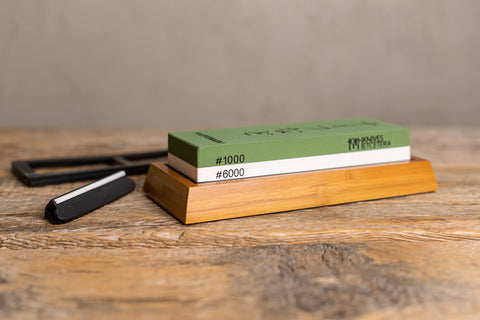
- Double-sided whetstone with a coarse and fine grit
- Bowl of water
- Towel
How to Sharpen with a Whetstone - Choose the Right One
If you don't already have a whetstone in your home, you should buy one! We recommend using a double-sided whetstone with 6,000 (fine) grit on one side and 1,000 (rough) grit on the other. Without trying to be too technical, a small number means a coarse grit to the stone and lighter sharpening abilities.
Ideally, you want various stones with different grit options to ensure that the blade is as sharp as can be after sharpening. However, if you're just beginning, a two-sided whetstone with a rough and smoother grit is ideal.
Whetstone sharpening is a great method, though it takes some practice. Familiarize yourself with the stone before doing anything to the edge of the knife. That way, you feel more comfortable using it.
How to Sharpen a Knife on a Whetstone
Once you have everything you require, it's time to start the sharpening process. It's often best to make yourself comfortable when sharpening, so sit down in a nice chair, turn on some relaxing music, and get going with your whetstone and knives.
Step 1 - Wetting the Sharpening Stone

If you've got a whetstone, it probably has to be wet. Therefore, you should submerge the stone in water until you don't see air bubbles coming out. It should take longer to soak in.
Make sure that you frequently wet the stone during this sharpening process. Whetstone dust plus water makes a slurry. This is what's actually doing the work while you're sharpening the knife.
Here's a Tip:
Once you start sharpening, you shouldn't completely soak your stone again because that washes the slurry away. Just add a few drops of water as necessary.
Step 2 - Find the Angle on the Side of the Blade

If you've researched blade sharpening before, you've probably heard about the edge angle. Essentially, the angle determines how pointed the edge is, with a smaller angle being more pointy. Though an edge with a point is good to cut things, it's not highly durable. Conversely, an edge without a full point isn't the best for cutting but is more durable.
We could go on and on about the right angle for your knife-edge, but there's so much nuance, and it might not matter. Therefore, we're not going to focus as much on the exact sharpening angle of the blade and more about staying consistent throughout your sharpening task.
The simplest and easiest way to get the right angle is to put the blade so that it sits perpendicular to the stone, rotating it halfway between the horizontal and vertical edge to make a 45-degree angle. Then, you go halfway again to create the 22.5-degree angle.
This process ensures that you are holding the blade at the right angle. Try to remember the amount of space between the back of your knife and the stone for consistency. With that, you should do the same thing on the opposite side.
Here's a Tip:
Sharpening your blade is easier if you place the knife-edge on the stone with the spine of your blade halfway up the horizontal thumb of your fingers. That gives you roughly the right angle. Don't focus on the point right now, and make sure that you're giving slight pressure without it being too much.
Another thing to consider is hand placement. You should start with the handle in the dominant hand to feel more natural and comfortable.
The hand holding the handle must keep a firm grip so that the other hand (applying the pressure) can be situated so that your fingers stay on the blade and near the edge. Ensure that you've got a firm grip throughout the process. If you lose control of your Japanese blade, you're going to hurt your fingers, damage the whetstone, and mess up the edge. Always go slow and use control.
Step 3 - Redefine the Edge

A dull knife is dangerous and annoying to use. Once your stone is prepared, and you have the right angle, the next step is most important. You must redefine the edge to get a razor-sharp cutting tool.
To do that, you want to use a coarse stone, such as the 1,000-grit. Find the angle and start with a back and forth motion. You should only apply pressure when it's time to pull the knife back.
If you apply pressure during the forward stroke, it could damage the stone and mess up the edge. Make sure you're applying a good amount of pressure by standing up and putting your weight into it if necessary.
Here's a Tip:
Sharpening isn't something you rush into, so make sure you're going slow. Instead of rushing, focus on maintaining constant pressure and keep the angle consistent throughout the back and forth motion. Work carefully, and start from the blade part closest to the handle and move outward toward the point.
You want to work using 1-inch sections during your first time because it's easier to keep a consistent angle on the blade this way.
Once you begin getting toward the pointed edge of the blade, the blade is likely to curve. How can you handle that? The easiest way is to rotate your blade as you pull the knife back. Do that slowly, and you can match the curve of your blade while keeping the cutting edge consistency.
The number of times you do that depends on a few factors. However, we recommend doing it about 10 to 15 times before you go to the next section. You should also see how dull your blade is and consider how much pressure you're applying, but 10-15 times is a great estimate since you can't over-sharpen a blade.
Another Tip to Help You Along
Ultimately, the best way to decide when to move on to another section is to carefully feel the blade with your fingers. Place a thumb on the belly of your blade, moving it to the cutting edge. You may feel a rough patch right on the edge, which is called a burr. Now, you can begin with the next section.
Sharpening can take a bit more time than you think, so be patient. Once you've gone down the full side of the blade, you can flip it over and repeat it on the opposite side, using the same amount of pressure, and testing it with your fingers as you did before.
Typically, you want to use the rough grit side of your whetstone. Though you can test it with your fingers to see how rough it is, this is usually unnecessary.
Step 4 - Polish the Edge

For this step, you aren't technically polishing the blade, but it's the best description we have for it. Ideally, you want a range of four to six stones with various grit options to work your way through them and easily sharpen your knife. However, as a beginner, you probably don't want to buy another whetstone, and that's okay.
You can just flip the stone over to the fine grit and repeat the process from Step 3. Work down one side of your blade, flip it, and work down the opposite side of the blade. When that's done, move on to your final step.
Sharpening your knife isn't that difficult, but it does take time. Since you have to do each side of the blade separately with both whetstone grit sides, you're working on the same knife four times.
Step 5 - Hone the Edge

You're not quite done with your sharpening task yet! Now, you can take your honing steel and hone your blade. While it's not a knife sharpener in itself, it's essential to do this step!
There is no grit level here; it's all the same. Just make sure that you maintain the same angle blade as you did in step two to carefully pass both sides of your blade along the steel two to three times. This smooths out the blade and aligns it somewhat. It can also remove some of that burr you created previously.
Now that the knife is sharpened, you can test it with paper or any kind of food.
How to Sharpen a Pocket Knife with a Whetstone
The steps for sharpening a pocket knife with a whetstone are similar to traditional knives.
Step 1 - Lubrication
While some people feel that they should use oil, you can wet the stone as you did for the first step earlier.
Step 2 - Sharpen a Side Using Coarse Grit
Angle your knife blade roughly 15 degrees against the rough grit side of the sharpening stone.
During the sharpening process, you must keep the same angle while you sharpen, and it's not easy. Once you're comfortable with the blade's angle, start to stroke the blade over the whetstone. You can bring it towards or away from you.
While you don't need a ton of pressure here, we think light to moderate weight is adequate, and make sure that you're consistent with pressure across the strokes. Pull your blade like you're trying to shave off a thin layer of the sharpening stone. Repeat this process for roughly 10 strokes on each side.
Step 4 - Stroke Alternate Sides
Once you've done each side, do another 10 strokes or so but change the side for each stroke. Make sure you pull with your fingers to ensure consistency.
Step 5 - Use the Fine Grit
Now, you should repeat steps two through four with the fine grit.
Basic Knife Sharpening Tips
Here are a few tips for sharpening a Japanese knife or any other type:
- If this is your first time ever using a sharpening stone, work slowly. This is the most important tip we can give you! Keeping a consistent angle is also essential to determine if the knife gets very sharp. Remember, you're working with a knife, and a dull knife can be just as dangerous!
- Practice using a knife you don't care that much about. Sharpening a knife takes skill, and you're likely to mark or scuff it trying to learn the motions. Therefore, you want to practice the technique on something inexpensive.
- When using the thumb to gauge the angle for knife sharpening, make sure it doesn't rub against your stone as you move back and forth. It might hurt!
Advanced Tips for How to Sharpen Knives with Whetstone
- Sharpening your knife wears down your whetstone, so rotate it often.
- You should have a series of stones of various grit levels. Below 1,000 grit are suitable for fixing major damage to the blade, such as pits or chips. However, you may only need quick sharpening with high-grit stones (6,000+).
- Sharpened blades are easier to use. After sharpening, use honing steel for the best results.
- Knife sharpening is part of life, so invest in a good stone set!
Caring for Your Kitchen Knives

You've sharpened your knives now, so make sure to keep them sharp. Here's how:
- Hand-wash them and never put them in the dishwasher.
- Don't leave dirty knives in the sink. They can get dented or scratched by other dishes.
- Consider the sharpening process and check your kitchen knives all the time.
- Use both the coarse and fine grit edges of your whetstone for best sharpening results.
- Sharpening the edge of your knives requires honing to straighten them.
How to Sharpen a Knife with Whetstone - Final Thoughts
Sharpening a knife is important, and it isn't easy for most people. However, sharpening does take time and effort, but it is well worth it when you have sharpened knives that cut through anything quickly and effortlessly.
Now that you've learned how to sharpen a knife using a whetstone, you can sharpen knives whenever the need arises.